
電子工作のはじめはLチカでしょ!と思い、ラズパイ5でLチカしてみます。
接続図
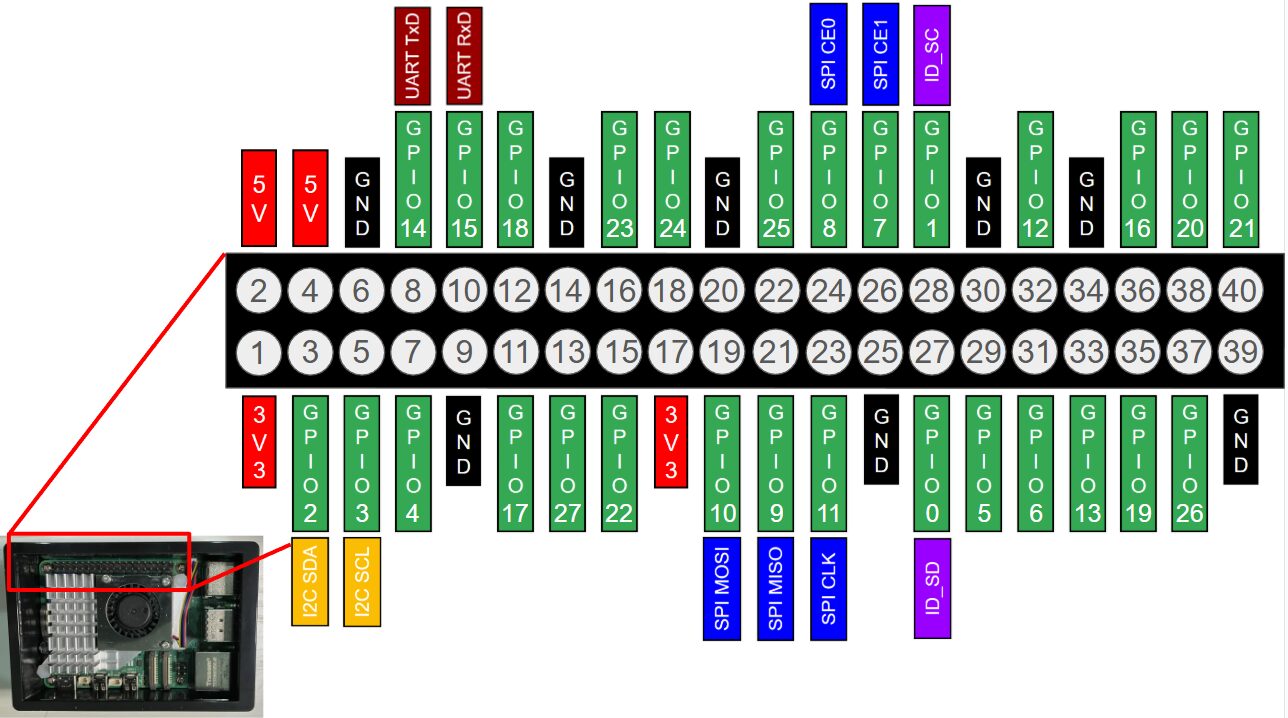
ラズパイ5のピン配置は以下のようになっています[1]。
今回は下図のように回路を作ります。
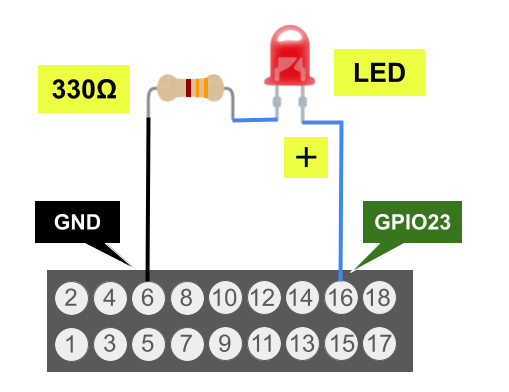
接続している様子は以下です。

PythonでLED点灯
LEDを点灯するPythonコード led_blink.py を以下のように書きました。
import gpiozero
import time

LED_PIN = 23

led = gpiozero.DigitalOutputDevice( LED_PIN )

while 1:
    led.value = 1
    time.sleep( 1 )
    led.value = 0
    time.sleep( 1 )
このソースコードを scp コマンドを使ってSSH経由でラズパイにファイル送信します。
$ scp led_blink.py setoti@raspberrypi.local:/home/setotiSSHでラズパイに接続して、led_blink.pyを実行することでLEDを点滅させることができます。
$ ssh setoti@raspberrypi.local
~~~~ SSH接続 ~~~~~
$ python led_blink.py
Lチカさせた様子は以下のようになります。
C言語でLED点灯
本格的な開発ではC言語を使うだろうと思って、C言語でも書いてみました(ChatGPTでほぼ作ってますが...)。
まず、必要なパッケージを以下でインストールする。
$ sudo apt update
$ sudo apt install -y libgpiod3 libgpiod-dev gpiod
以下のC言語のファイル led_blink.c をラズパイに送る。
#include <gpiod.h>
#include <stdio.h>
#include <unistd.h>

int main(void)
{
    const char *chipname = "/dev/gpiochip0";
    unsigned int line_offset = 23;  // GPIO 23

    struct gpiod_chip *chip = NULL;
    struct gpiod_line_config *line_cfg = NULL;
    struct gpiod_request_config *req_cfg = NULL;
    struct gpiod_line_request *request = NULL;
    struct gpiod_line_settings *settings = NULL;

    /* --- 1. GPIO チップを開く --- */
    chip = gpiod_chip_open(chipname);
    if (!chip) {
        perror("gpiod_chip_open");
        return 1;
    }

    /* --- 2. ライン設定を作る --- */
    settings = gpiod_line_settings_new();
    gpiod_line_settings_set_direction(settings, GPIOD_LINE_DIRECTION_OUTPUT);
    gpiod_line_settings_set_output_value(settings, GPIOD_LINE_VALUE_INACTIVE);

    line_cfg = gpiod_line_config_new();
    gpiod_line_config_add_line_settings(line_cfg, &line_offset, 1, settings);

    /* --- 3. ライン要求設定 --- */
    req_cfg = gpiod_request_config_new();
    gpiod_request_config_set_consumer(req_cfg, "blink");

    request = gpiod_chip_request_lines(chip, req_cfg, line_cfg);
    if (!request) {
        perror("gpiod_chip_request_lines");
        return 1;
    }

    /* --- 4. Lチカループ --- */
    for ( int i=0; i<10; i++ ) {
        gpiod_line_request_set_value(request, line_offset, GPIOD_LINE_VALUE_ACTIVE);
        sleep(1);
        gpiod_line_request_set_value(request, line_offset, GPIOD_LINE_VALUE_INACTIVE);
        sleep(1);
    }

    /* --- 5. 後始末 --- */
    gpiod_line_request_release(request);
    gpiod_line_settings_free(settings);
    gpiod_line_config_free(line_cfg);
    gpiod_request_config_free(req_cfg);
    gpiod_chip_close(chip);

    return 0;
}
ソースコードの中身を完全に理解しているわけではないですが、各関数は以下の設定をするみたいです[2]。
- line_settings:方向 + 初期値
- line_config:対象ピン
- line_request:GPIOラインの使用件の要求
以下でコンパイルして、LED点滅を実行する。
$ gcc -o led_blink led_blink.c -lgpiod
$ ./led_blink
これでC言語のLED点滅ができます。
おわりに
ラズパイ5でLチカをやってみました。最近はPythonでもLチカができるのですね。逆にC言語でLチカする情報が少なくて大変でした。
次回はスイッチ入力を試してみたいと思います。
■参考文献
[1] 福田 和宏, "電子工作&サーバー構築徹底解説! ラズパイ5完全ガイド," 株式会社日経BP, 2024.
[2] Golaszewski, Bartosz. libgpiod Documentation. 2017‑2025, https://libgpiod.readthedocs.io/en/latest/index.html. (参照2025-11-09).

¥3,564 (2025/11/01 00:51時点 | Amazon調べ)